Epson Interactive Projector user guide
Epson Interactive Projectors are a collaboration tool used to annotate, capture and share content on any surface.
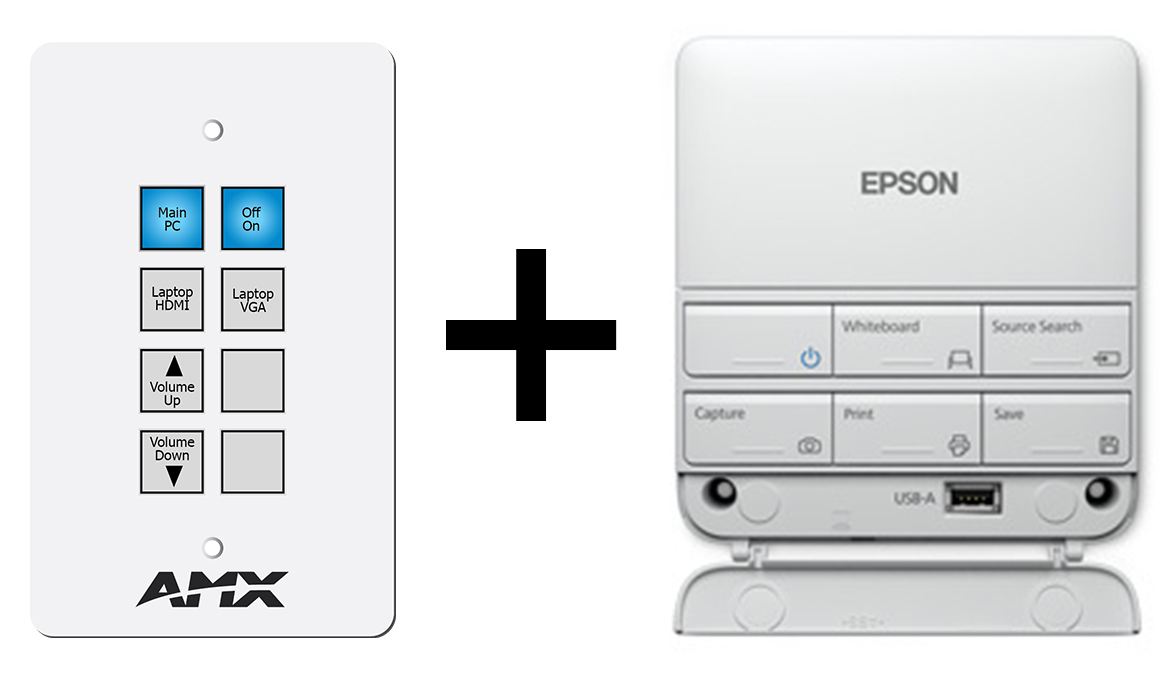
You can use Epson Interactive Projectors in several learning spaces and meeting rooms across UQ. All rooms with these projectors will have an Epson button panel on the wall.
Starting the Interactive Projector
Epson Interactive Projectors can be used in rooms with and without a connected audiovisual (AV) system. To ensure the system works correctly, it's important to identify which AV system is available in your room and use the correct panel to start the system.
Rooms with an AV touch panel and Epson button panel
Use the room's AV touch panel to power on the room's AV system, then select a source input. The interactive projector will turn on automatically.
Rooms with an AMX button panel and Epson button panel

- On the AMX button panel, select the 'Off On' button and then select a source input.
- If there is no 'Off On' button on your AMX button panel, select your source input and the system will power on automatically. All buttons on the panel will flash blue while the system is warming up.
- The Interactive Projector will turn on automatically. You don't need to press the power button on the Epson button panel, as the AV system is connected to the projector.
Rooms with an Epson button panel only
Select the blue power button on the Epson button panel to turn the projector on.
Using 'Whiteboard Mode'
- To use 'Whiteboard Mode', select the 'Whiteboard' button on the Epson button panel. The display will turn into an interactive whiteboard.
- Choose an interactive marker from the storage container on the wall and click the button on the side of the marker to turn it on.
- Press the marker to the display to begin using the interactive functions.
Toolbar options
Once you begin writing on your display, an onscreen toolbar will appear. These toolbar options can be used to control most of the projector's interactive functions:
| Icon | Functionality |
| Change the display to 'Annotation Mode'. This mode allows you to annotate content from a connected PC or laptop. | |
| Change the display to 'Whiteboard Mode'. This will turn the display into an interactive whiteboard. | |
| Undo the last annotation | |
| Redo the last annotation | |
| Select all objects in a rectangle area | |
| Select all objects in a freehand area | |
| Turn the pen into a pointer you can drag | |
| Capture the selected area as an image | |
| Insert or display a .jpg or .png image from a USB or network folder | |
| Insert a shape | |
| Change custom pen or highlighter colour and width | |
| Change the display to 'Computer Interactive Mode'. This mode allows you to use the interactive pen as a mouse in rooms with connected PC. Left click by tapping the marker on the display. Right click by holding down the button on the pen and tapping on the display. | |
| Write or draw freehand lines with a custom pen | |
| Write or draw freehand lines with a highlighter pen | |
| Change the pen to black | |
| Change the pen to red | |
| Change the pen to blue | |
| Use an eraser | |
| Clear all content on the page | |
| Display the current colour and mode for both interactive pens | |
| Hide the toolbar after each annotation | |
| Close the toolbar | |
| Switch to 'PC Free Annotation Mode'. This mode allows you to annotate content from different sources. |
Button panel options

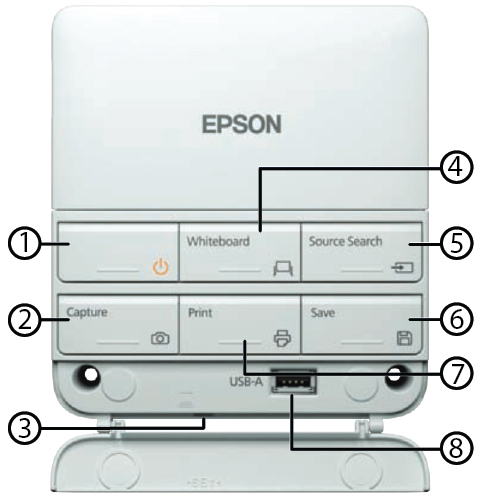
- On/Off button: turns the Interactive Projector on or off. Don't use this button if your AV system is controlled by an AMX button panel or AMX touch panel.
- Capture button: captures the content you're currently projecting as an image.
- USB-B port: for connecting your laptop to the Interactive Projector.
- Whiteboard button: changes the display to 'Whiteboard Mode'.
- Source Search button: displays all available source inputs. Don't use this button if your AV system is controlled by an AMX button panel or AMX touch panel.
- Save button: saves the content you're currently projecting as an image.
- Print button: the print function is not available at UQ.
- USB-A port: for connecting a USB flash drive to the Interactive Projector.
Saving annotated content to USB
- Connect your USB to the USB-A port on the Epson button panel.
- Select the 'Save' button on the panel. The 'Save menu' will appear.
- Use the interactive marker to enter a filename through the on-screen keyboard.
- Select a location to save the file to.
- Select a file format. You can choose either PDF, PNG or EWF.
- Select 'Save'.
Displaying from a USB
You can only display JPG, PNG, EWF or PDF files from USB. If you need to display a different file type, you'll need to use the room's Desktop PC or your own device.
To display content from a USB:
- Connect your USB to the USB-A port on the Epson button panel.
- Select
 from the on-screen toolbar to display a list of files you can load.
 - Select your file to display it.

