Hero banner
This guide is for sites built in the new version of Drupal (like Study or Scholarships).
If you're working on a Drupal 7 (UQ Standard) site, see hero banners on Drupal 7.
A hero banner sits at the top of the page and displays the page's H1 heading.
Depending on the page, your hero banner may also display:
- a large image that captures the user's attention and sets the tone for the page
- lead text that provides an introductory snapshot of the page's content.
Together, the image and text should help users understand what the page is about and whether it's relevant to what they're trying to do.
Hero banners change shape depending on what device your user is viewing it on (e.g. mobiles, tablets). It's important to:
- use the right templates to create your hero image, following the guidelines for where to place faces and focus points
- check your banner resizes as expected on different screen sizes before you publish.
There are different types of hero banners on new Drupal, depending on the type of content you're working on.
For most pages, use a One UQ hero banner.
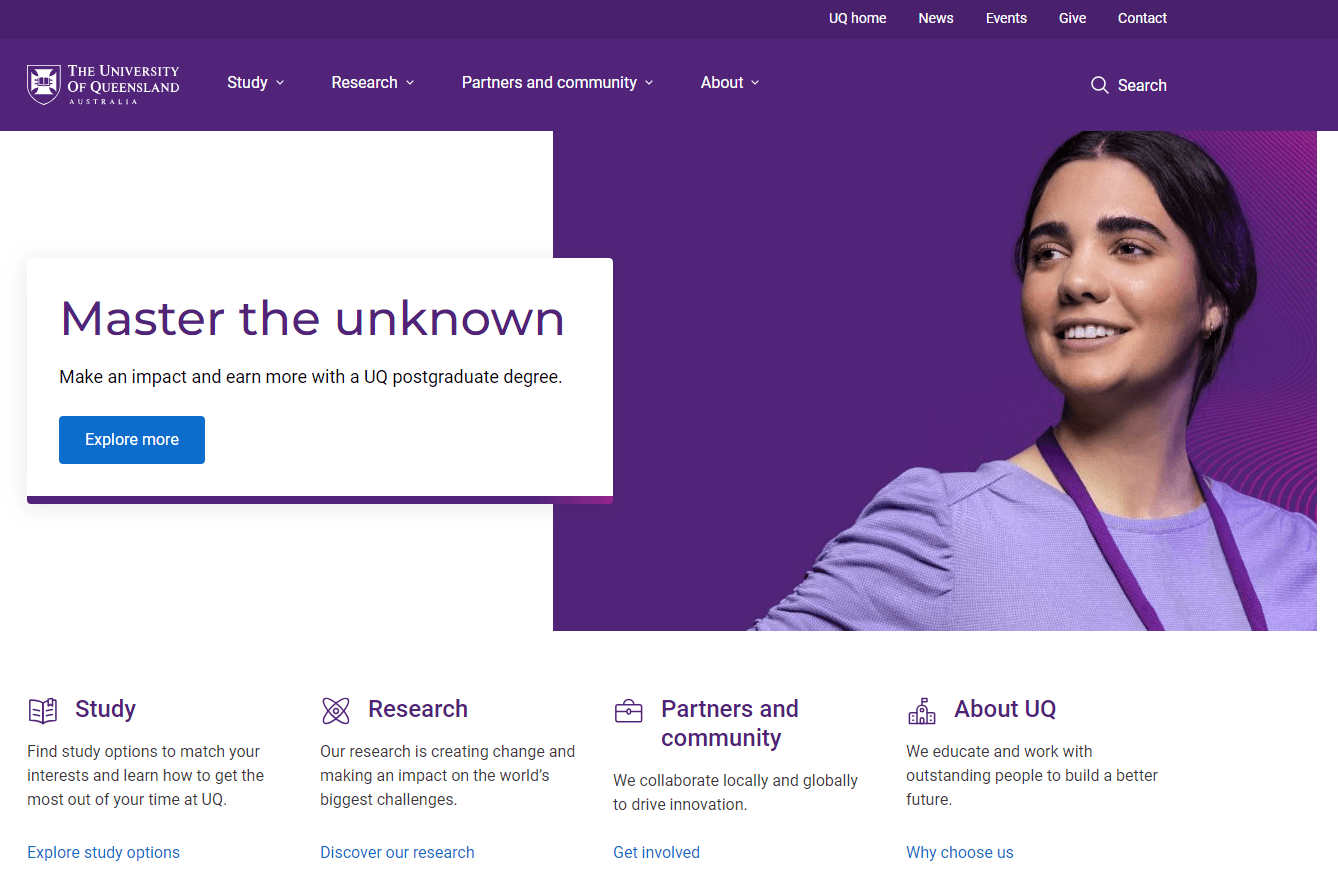
Landing pages, events and articles use One UQ hero banners.
Example desktop view

Example mobile view

Step 1: Select your base image
Select an image to feature in your hero banner.
It must be at least 1528px wide x 672px high.
Step 2: Use the template to create your hero image
Using the template will ensure the image displays correctly across various screen resolutions.
- Download the One UQ hero template (staff login required) from the DAM. If you don't get taken directly to the template, make sure you're logged in to the DAM and try the link again.
- Open both the template and your image in Photoshop.
- Copy and paste your image into a new layer on the template.
- Ensure the 'SAFE ZONE' is at the top of the 'Layers' panel.
- Select 'Edit '> 'Free transform' to resize your image proportionally.
- Use the guidelines to position your image correctly, with the main content (such as faces) inside the indicated guidelines. The space inside the safe zone is what will display on smaller screens.
- Hide the 'SAFE ZONE' by clicking the eye icon to the left of the layer name.
Step 3: Save your hero image
- When you are happy with your hero image, select the 'Layers' tab at the top of the screen or the 'Layers' panel on the bottom right of the screen and choose 'Flatten image'. (If you are asked to discard hidden layers select 'OK'.)
- Go to 'File' > 'Export'>'Export as'.
- Set the 'Format' as JPG and 'Quality' at 6.
- Click the 'Export' button and then save. Follow the UQ file naming conventions when saving your image.
Your image will be saved at the correct specifications:
- Image size: 1528x x 672px
- Resolution: 72 DPI
Step 4: Add to page
How you add your hero image depends on the type of page and whether your page will have local navigation (side menu).
Check if your page has local navigation
Articles and events
Add your hero image via the 'Edit' screen.
- Complete 'Title'. This is the heading (heading 1) that will display at the top of the page
- For events only, complete 'Lead text'. This displays below the page heading. This should be a whole sentence with a full stop at the end.
- In 'Hero image':
- select 'Add media' to add an image to your hero
- select either 'Choose files' (to upload a new hero image) or search for an existing one using filters
- select 'Insert selected'.
Your hero image will display on the page.
If you need to update your hero banner, you can make changes on the 'Edit' screen. You can replace your hero banner by removing the current image and choosing a new one.
Make sure you're following other best practice guidelines for creating these content types:
Landing pages – with local navigation
Add your hero image via the 'Edit' screen. Make sure your page is added to the local navigation.
- Make sure the 'Show in navigation' checkbox is checked.
- Complete 'Hero title'. This is the heading (heading 1) that will display at the top of the page.
- Complete 'Lead text'. This displays below the page heading. This should be a whole sentence with a full stop at the end.
- In 'Hero image':
- select 'Add media' to add an image to your hero
- select either 'Choose files' (to upload a new hero image) or search for an existing one using filters
- select 'Insert selected'.
Your hero banner will display on the page. Don't create a hero banner on the 'Layout' screen.
If you need to change your hero image, you can replace it by removing the current image in the 'Hero' section.
Landing pages – no local navigation
Add your hero image via the 'Layout' screen. Most landing pages should have local navigation, so make sure your page meets the exception criteria before proceeding.
- Make sure the 'Show in navigation' checkbox on the 'Edit' screen is unchecked.
- On the 'Layout' screen, add a section. Choose 'Sections (Design System)'.
- Complete the fields:
- Administrative label (optional) – this label isn’t visible to users. Use it to help other people editing your page understand the intent of a section.
- Student type (Study website only) – choose from 'Domestic', 'International' or 'Both'.
- Select 'Add block' in your new section.
- Select 'Create content block'.
- Choose 'Hero'.
- Complete the fields:
- Hero title – this is the heading (heading 1) that will display at the top of the page.
- Hero image – insert your hero image and follow the prompts. Remember to populate the 'Alt text' field with a meaningful description of the image content.
- Lead text – this displays below the page heading. This should be a whole sentence with a full stop at the end.
- Select 'Add block'
Your hero banner will display on the page. Don't add a hero image on the 'Edit' screen.
If you need to edit your hero banner:
- navigate to the 'Layout' screen on your page
- open the block by selecting the pencil icon in the top-right corner of your banner, then 'Configure'
- edit any text, or, to replace your hero image, remove the current image and choose a new one
- select 'Update'.
Check different screen sizes before you publish (mobile, tablet, desktop) to make sure that your banner doesn't crop people's faces or key parts of the image.
The homepage hero banner includes a mandatory CTA button and is only used on the UQ homepage. Homepage content needs to be approved by the Web Audiences Working Group.
Example desktop view
Example mobile view

Step 1: Select your base image
Select an image to feature in your hero banner.
It must be at least 1528px wide x 1000px high.
Step 2: Use the template to create your hero banner
- Download the Homepage hero template (staff login required) from the DAM. If you don't get taken directly to the template, make sure you're logged in to the DAM and try the link again.
- Open both the template and your image in Photoshop.
- Copy and paste your image into a new layer on the template.
- Ensure the 'SAFE ZONE' is at the top of the 'Layers' panel.
- Select 'Edit'> 'Free transform' to resize your image proportionally.
- Use the guidelines to position your image correctly, with the main content (such as faces) inside the indicated guidelines. The space inside the safe zone is what will display on smaller screens.
- Hide the SAFE ZONE' by clicking the eye icon to the left of the layer name.
Step 3: Save your hero banner
- When you are happy with your hero image, select the 'Layers' tab at the top of the screen or the 'Layers' panel on the bottom right of the screen and choose 'Flatten image'. (If you are asked to discard hidden layers select 'Ok')
- Go to 'File' >'Export' >'Export as'.
- Set the 'Format' as JPG and 'Quality' as ‘Very good’.
- Click the 'Export' button and then save. Follow the UQ file naming conventions when saving your image.
Your image will be saved at the correct specifications:
- Image size: 1528x x 672px
- Resolution: 72 DPI
Check different screen sizes before you publish (mobile, tablet, desktop) to make sure that your banner doesn't crop people's faces or key parts of the image.
On the Scholarships website, you must select from the pre-loaded approved hero banners. To request a new hero banner, contact ugscholarships@uq.edu.au.